

When the time comes to print your job, there are a couple of crucial factors to consider that make a huge distinction in the quality of your final file. One of the most important factors to consider you can make in preparing your task is whether to print in bleed. If you’ve been preparing to professionally print a document, you’ve probably encountered the terms “complete bleed” and “no bleed”. Unless you’re fluent in printing, you may not know what either means or what effect they may have on your task. At the end of this blog post, you need to have a much better understanding of what bleed is, how it impacts your task, and how to correctly set bleed in your file.
What is a bleed in printing?
In fundamental meanings, complete bleed printing is used when a project requires a printed image or file to have no margins or to put it simply when the printed color & images extend all the way to the edge of the paper. In useful terms, printing devices can’t actually print all the way to and the edge of a sheet of paper. Considering that something requires to hold the paper in place, unfinished print tasks, or jobs produced without bleed, will generally have a white border around each page. If a job requires color and images to extend all the way to the edge of the document, otherwise referred to as printing in bleed, the white unprinted edges of the document are simply cut off.
Simple enough, right? In practice, mistakes including bleed are really common. In fact, improperly set bleed is among the most typical errors we see in the files we’re sent. If you wish to make sure that your file is printed correctly and prevent any unintended hold-ups for file adjustment in pre-press, there are a couple of simple steps you can take to comprehend how printing in bleed works and what it implies for how you set up your document.
What do I do to get a full bleed project all set?
We mentioned above that printing a full bleed job may need the customer to provide us a specific kind of file to get the job done right. It’s an easy procedure to change a couple of settings from your typical print settings. The primary change is setting the bleed details for your document or task. This differs depending upon what software application you have actually produced the file in. Since the majority of our tasks are produced in Adobe InDesign, we’ll share the steps for setting bleed in InDesign listed below. (If you’re utilizing Illustrator, discover instructions on how to set bleed here. Or if you’re using Photoshop, you can follow these instructions instead.).
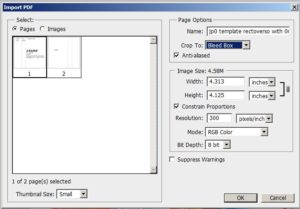
If you understand you desire a document complete bleed ahead of time, you can set this when you initially create the file in InDesign. When you initially produce your document, choose the Print option and choose your paper size. It’s under Print, then Preset Particulars, and near the bottom of the alternatives are “Bleed and Slug”. Simply set the top, bottom, left and ideal fields to include a 0.125 (⅛ inch) bleed.
If your file is currently set up and you want to add bleed after the fact, simply go to Submit > File Setup. Set the top, bottom left and ideal fields to consist of a 0.125 (⅛ inch) bleed under the Bleed and Slug alternatives:
Now we’ve produced bleed guides on your file, so a red line must appear on the canvas ⅛ of an inch off the side of your document. If you don’t see this, press W on your keyboard to expose your guides. You ought to see a trim line in black, which will be the edge of your finished file. Beyond the trim line, your bleed guides will be displayed in red.
Simply setting bleed in your document settings frequently isn’t enough. In order to get our file to print properly, we might require to make some modifications to the file. Lots of designers set bleed, however then forget to extend their artwork past the trim line to the bleed guide. Before sending it to the printer, make certain that the artwork you want complete bleed is lined up to those bleed guides outside the trim. Your photos, artwork and background colors all require to encompass the bleed line. With InDesign, the image or object ought to snap ideal to the guidelines when pulled to them.
Below is a visual to assist. This is an example of a file that has improperly set bleed. Since the picture does not extend past the trim line, the finished item may have white space around the outside edges of the picture.
Below is an example of how that very same photo must look. To guarantee the image prints all the way out to the edge of the document, just make certain it extends out to the bleed lines. It’s also crucial to make certain any essential artwork remains within the trim line, as anything in between the trim and bleed lines will be cut off throughout printing.
After you have actually gone through your document to make sure that all artwork, background colors and photos reach the red bleed line, you’re ready to export your declare print. Make certain the right options are picked when you export your file as a PDF to the printer.
During the export, inspect the box that says “All Printer’s Marks” to guarantee that all of the information the printer requirements will be consisted of in your exported file. Under Bleed and Slug, check “Use Document Bleed Settings” to bring your bleed settings through into the exported PDF. This ought to make sure everything appears just as you desire it to on the page. Ensure that the balanced out location is greater than or equal to the bleed, otherwise, your crop marks might reveal on your final document.
Is complete bleed printing right for my job?
Thomas Group has every option you might require for your edge-to-edge printing desires. With advanced digital printing that can everything from small projects to large-format printing tasks, our business has the ability to create the prints you require at the sizes you want. Our printing processes correspond, there’s no minimum or maximum order, and we offer the highest-quality final products in the business. We can print on a wide array of materials, consisting of vinyl, canvas, all kinds of paper and cardboard. Whether full bleed or no bleed printing is your last choice, we’ll have you covered.
The simplest way to find out which alternatives best suit your task is to get in touch with Thomas Group and let our specialists assist you to discover what will work well for your needs, and to help you attain the very best print job possible. Our personnel can help you with details like what file format will work best, in addition to what completing options might work best for your task. With a few of the most skilled employees in the industry and decades of NYC printing behind us, Thomas Group can use consumers with a range of options on nearly every print task.